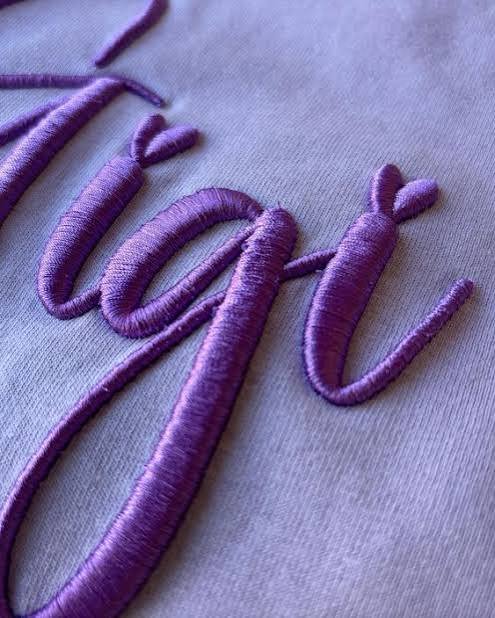

3D puff embroidery raises satin stitching over a layer of foam. The file behind it is built differently from a flat design, and some artwork will not rise cleanly however it is digitized. This guide collects what machine makers, foam makers and experienced digitizers publish on foam, column widths, end closure, sewing order and exposed-foam faults, and where they disagree.
How 3D puff works
A sheet of foam is laid over the area and the raised elements sew on top. Madeira UK: As the machine stitches over the foam, the thread compresses and shapes it
.[1] The stitching also cuts it. Melco's puff guide: The needle penetrations perforate the foam and allow for the excess to be pulled away upon completion of the sewing.
So the foam is not cut to shape first; Melco notes that the foam is cut oversized and doesn't have to be placed accurately
.[2]
Satin suits this. Hatch: a satin column cuts the foam with every penetration point
.[3] But satin stitches only have needle penetrations on their sides
, Melco notes, so column ends stay unperforated unless the file closes them (see closing the column ends). Leftover crumbs can be shrunk with a heat gun.[2]
Makers describe the foam differently: Gunold's is 100 % polyethylene
,[4] Tajima calls it urethane,[5] and ZSK refers to EVA foam.[6] What does not work, says Justin Armenta in a Wilcom Q&A: craft-store foam is not dense enough to support embroidery
.[7]
Designs that rise and designs that don't
Erich Campbell, writing in Impressions, is blunt: Let's face it, foam is not for fine detail.
The finer the strokes, the flatter the design will be
, while the boldest designs tend to consist of wide, unbroken satin stitch columns
.[8]
- Good candidates: Melco asks for
large enough elements to support the foam
; Madeira USA looks forart where you can use primarily columns to create most elements
.[2][9] - Poor candidates: fine detail, thin strokes and tight gaps. Armenta:
Most fine details that need 65 needles won't work well with the 3D puff process.
[7]
A design need not be all foam. Campbell describes foam work with multilayer beveled constructions and even entire logos
,[8] and Ed Levy, writing for ASI, describes printed artwork with words or specific elements puffed up
.[10] Our reading: raising only the bold parts of a logo and sewing the rest as flat embroidery stays within every source's rules.
Flat vs puff: what changes in the file
| What changes | Flat embroidery | 3D puff elements |
|---|---|---|
| Stitch type | Satin, fill or run, as the design needs | Satin columns. Melco: Only satin stitches will give the raised puff look.[2] |
| Density | Standard for the thread and fabric | About double, per Gunold, Madeira and Campbell[4][11][8] |
| Underlay on top of the foam | Normal underlay | Usually switched off; Melco adds tack or walk stitches by hand[3][7][12] |
| Column ends | No foam to close | Closed by capping, pinching or tapering[2][8] |
| Machine stop | Not needed for foam | A stop before the puff color to lay the foam[2][11] |
| Sewing order | Planned for the design | Raised parts sew last[2] |
| Holding the foam | — | Tack stitches: a walk inside the shape (Melco) or a single 4 mm run in the middle (Hatch)[2][3] |
| Compensation | Pull compensation as needed | Sources differ: no pull and 0.3–0.4 mm push compensation (Armenta); 5–15% "stretch" (Madeira USA)[7][9] |
How dense is "double"? Published spacing for puff satins (smaller means denser) clusters around 0.15–0.20 mm: Hatch 0.16 mm, Armenta 0.18 mm, Campbell 0.15 to 0.20 mm, Madeira UK about 0.2 mm, Tajima 0.2 mm on end-face satins.[3][7][8][1][5] Melco's two documents differ: 1.8 points in the PDF, 1.5–1.7 points in the help article.[2][12] Printful's help page is the outlier, saying puff requires more space between stitches
,[13] the opposite of the makers above. None of these are machine-independent settings. On compensation, see what is pull compensation.
Foam thickness
| Source | Thickness | Conditions and notes |
|---|---|---|
| Melco puff guide[2] | 2 mm or 3 mm | Melco's two puff presets |
| Gunold product sheet[4] | 3 mm, ±10% | Thickness varies with production. PE 20 is soft, for outerwear; PE 10 is harder, for caps and logos |
| Gunold Canada[14] | 3, 4 and 6 mm | Thicker foam may need more density and a longer stitch length; Dense foam gives a sharper, taller look than Classic |
| Madeira USA foam guide[15] | 3 mm | Standard foam gives a rounded raised ridge; firm foam a sharper, squared edge |
| ZSK[6] | 3 mm | Two hardness grades, 38D (soft) and 75D (hard) |
| Armenta, Wilcom Q&A[7] | Usually no more than 4 mm | 3–4 mm for half-inch letters |
| Melco help article[12] | 5 mm or thinner | With 6 mm foam, the needle shank ends up in the foam |
The principle is more consistent than the numbers. Levy: Use as thin a foam as possible to produce the effect you want
.[10] Campbell: The goal is to use just enough thickness to arrive at the desired dimensions.
He warns: Extremely tall foams can 'lean' or shift during running and can compress considerably
.[8]
Two layers. Gunold, Madeira, Campbell and a 2014 Printwear & Promotion article describe stacking foam.[4][11][8][16] Armenta does not recommend it: the second layer can shift and cause needle breaks.[7]
Color. Madeira USA, Hatch and Madeira UK match the foam to the thread, because it helps hide any visible foam
(Madeira UK).[9][3][1] The 2014 Printwear article calls exact matches unnecessary.[16] And from Gunold Canada: Share the thickness of Puffy Foam™ with your digitizer.
[14]
Column width: 3 or 5 mm minimum?
| Source | Minimum | Maximum | Conditions |
|---|---|---|---|
| Melco puff guide[2] | 3 mm | 11 mm | "A satin stitch width of between 3mm and 11mm should be used." |
| Melco help article[12] | 30 pt | 110 pt | Given in points; our reading is that this matches the PDF's 3–11 mm |
| Armenta, Wilcom Q&A[7] | Usually 3 mm; 2 mm "can work" | 12 mm; typically 10–12 mm | The maximum "depends on the machine"; 2 mm may compress the foam too much, depending on the design |
| Hatch[3] | — | Not much wider than 7 mm | Given alongside Hatch's auto-split setting |
| Printful[13] | 5 mm (0.2 in) | 12.5 mm (0.5 in) | Printful's own production spec, with at least 1.27 mm (0.05 in) of space between raised elements |
Both minimums are published: 3 mm (Melco, Armenta) and 5 mm (Printful's production spec).[2][7][13] Maximums run from about 7 to 12.5 mm. Hatch pairs its 7 mm with the advice If you have a slightly wider object, make sure you turn the Auto split off
,[3] so our reading is that it reflects a software default, not a limit of the foam.
Satin, fill and underlay
Fills. The sources split three ways. Melco and Gunold say satin only; Gunold warns: Step stitches will destroy the foam.
[2][4] Madeira USA allows fills, but the outcome is less effective than satin column stitches
.[9] Armenta and Campbell make fills work with a satin border to cut the foam; Campbell tilts the fill angle around 10-12 degrees
and extends the border about 0.8 mm beyond the fill.[7][8] Levy: with a heavy fill over foam, you probably won't love the effect
.[10] Our reading: satin is the default, and fill over foam is an advanced construction.
Underlay. Hatch: Stitching underlays would push the foam down, therefore they need to be switched off.
[3] Armenta also uses no underlay,[7] and Melco's help article generally advises against automatic underlay while adding edge or center walks by hand.[12] Campbell describes the failure: underlay falling off of cut foam edges and then popping out through the covering stitches
.[8] Levy dissents, calling for a solid underlay border
.[10]
Cutting runs. Madeira USA sews a 1 mm run outline because the short stitch length cuts the foam
.[9] Given Campbell's warning above, our reading is that cutting the foam before the cover stitches is not a settled practice.
Closing the column ends
Melco: add stitch penetrations to the top and bottom of the satin or the foam won't release completely
. It names two methods, capping and pinching; Campbell names capping and tapering.[2][8] Capping is the one the sources describe in detail:
- What a cap is. Melco:
a smaller satin stitch perpendicular to the ends under the final top satin stitch
.[2] Campbell's caps arestraight on the outer edge and jagged on the inner edge
.[8] - Where it sits. Armenta:
End caps should stick out about .5mm from the end of the satin
; Campbell gives roughly 0.5 mm too.[7][8] Hatch instead says the capneeds to sit exactly on the edge of the Satin object
.[3] - What goes wrong. Campbell ties cap placement to a fault where stitches
will 'fall' or 'roll' off of the end of the cap, making for a sloppy 'waterfall' look
, and names another,'tip-out,' whereby bits of foam 'tip' out of the cover stroke
.[8]
The sources we checked do not detail pinching or tapering. The goal, in Hatch's words: ensure that the foam does not stick out at the ends
.[3]
Sewing order and stitch direction
Melco: The portion of the design that will be puffed must be the last section to sew.
[2] The sequence the sources describe:
- Flat elements first.[2]
- Stop. Melco inserts a Hold command
just before the puff color
; Madeira programsa stop after the outline to facilitate adding the foam
; Tajima's cap tips stop the machineafter the contour is sewn
.[2][11][5] - Foam. An oversized piece, not placed exactly.[2]
- Tack-down, caps and puff satins. Tack stitches hold the foam, the end caps sew, and the top satins sew over both.[2][3]
- Tear away the excess and clean up (see the faults table).[4]
Direction. Campbell sets stitch angles perpendicular to their edges
and notes that foam requires gentle transitions into your curves and corners
.[8] When you order a puff file, ask for the stop for the foam to be marked for the operator; see 3D puff digitizing.
Lettering limits
Armenta: The size of the text isn't going to dictate the possibility of applying 3D puff.
What matters is the satin width and the "voided" areas[7] (in our reading, the open spaces in and between letters). None of the maker sources we checked give a minimum letter height for puff.
- Spacing. Printful's spec asks for at least 1.27 mm between raised elements.[13]
- Fonts. Printful's rule:
calligraphy fonts or thin, complicated fonts won't work for 3D puff embroidery
.[13] - Stock alphabets. Melco notes
they must be modified to work with Foam due to the 'open ends'
.[2] - Foam for small text. Armenta uses 3–4 mm foam for half-inch letters.[7]
Text too fine for foam can stay flat; see small embroidery lettering problems.
Curves, corners and joins
- Sharp corners. Campbell warns that
the sharp corner of foam under these stitches after foam removal can poke through
; his fix is amanual zigzag perpendicular to the top stitching
.[8] On sharp corners, Armenta saysMost of the time fractional spacing is used
, and adds:Be careful with stitch shortening.
[7] - Joins. Where strokes meet, the join
can result in a deep cleft in the design and/or foam showing through
; Campbell bridges it with "planks", low-density stitching.[8] - Points. For arrowhead-like points, Campbell uses
three to eight manual stitches placed in a tight, arrowhead shape
.[8]
Caps vs garments
Madeira UK calls caps one of the most common applications
.[1] Foam makers list garments too: Gunold mentions caps, promotion wear and outerwear
, Madeira sweaters and jackets, Madeira USA hats, bags and jackets
.[4][11][15] Some services limit it; Printful offers puff on hats only.[13]
| Consideration | Caps | Garments |
|---|---|---|
| Foam hardness | Harder foam: Gunold's PE 10 for caps and logos; Madeira UK's hard foam for structured items like caps and jackets[4][1] | Softer foam: Gunold's PE 20 for outerwear; Madeira UK's soft foam for sweatshirts, hoodies and T-shirts[4][1] |
| Needle | 75/11 sharp (Armenta); 80 sharp, titanium-coated (Madeira UK); sources also suggest a larger needle, such as an 80/12 (Levy) or a 90 sharp (Melco), to perforate the foam[7][1][10][12] | 75/11 ballpoint for knits (Madeira UK), chosen for the fabric rather than the foam[1] |
| Holding the foam | An elastic band or strap, which Campbell suggests especially for caps[8] | Tape or a very light coat of embroidery-specific adhesive[8] |
Note the overlap: Madeira UK puts jackets with hard foam, Gunold puts outerwear with its soft grade.[1][4] On caps, puff also has to fit the cap's sequencing and size limits; see cap vs flat embroidery digitizing and our cap digitizing service.
Foam showing: symptom, cause and fix
| What you see | Likely file cause | Likely production cause | Fix |
|---|---|---|---|
| Foam visible between stitches or along the edges | Density too low[1] | Foam color not matched to the thread; foam thicker than the file allows for[1][14] | Raise density; match the foam; tell the digitizer the thickness. Gunold's fallback: a 60 SES needle or a hot air blower[4] |
| Foam does not release at column ends | Open ends with no penetrations across them[2] | — | Cap or otherwise close the ends[2][8] |
| Stitches rolling off the ends ("waterfall") | Cap placement[8] | — | Reposition the cap; Armenta and Campbell extend it about 0.5 mm past the satin[7][8] |
| Foam corner poking through | A sharp corner in the column[8] | — | Gentler transitions, a manual zigzag, fractional spacing[8][7] |
| Deep cleft or foam showing where strokes meet | An unbridged join[8] | — | A low-density "plank" across the join[8] |
| Underlay poking out through the cover stitches | Underlay falling off cut foam edges[8] | — | Leave out underlay on top of the foam[3][7] |
| Raised area looks flat | Strokes too fine; underlay pushing the foam down[8][3] | Top thread too tight; craft foam[3][7] | Wider columns; no top underlay; looser top thread; embroidery foam |
| Fine strands of foam at the edges ("fuzzies") | — | Small remnants after tearing away[17] | Tuck them in, don't pull; then careful heat[17][11] |
Heat cleanup. Sources disagree. Hatch uses a heat gun on low, Campbell low, indirect heat
, and Madeira warns against too high a setting to avoid burning the thread
.[3][8][11] Gunold Canada instead says: Use a high setting, hold about 10-12 inches from the garment.
[17] Madeira USA and Tajima use a hair dryer; Tajima warns against holding it too close to polyester.[9][5] Campbell: polyester can melt and lighter colors scorch
. For show-through he suggests lightly rubbing the design with a piece of stabilizer or the back of your thumbnail
.[8]
Production and machine limits
- Speed. Melco:
Set your sew speed to 700.
[12] Armenta:Typically, I have seen 3D run best in the 650-750 range.
[7] Their figures, not universal settings. - Presser foot. Melco raises it
all of the way to its highest setting for the puff color
.[2] Campbell:I have done most of my own foam work on unadjusted machines.
[8] - Thread and tension. Armenta:
Polyester is stronger and works better with foam
.[7] Hatch suggests loosening the top threadto ensure that the stitching does not push the foam down
.[3] - Needle point and size. Advice conflicts: sharps on caps (Armenta), a larger 90 sharp (Melco's help article) or a larger needle such as an 80/12 to make larger holes in the foam (Levy, ASI), against SES points (Gunold; Printwear says they make larger perforations), while Madeira UK and Campbell choose for the fabric, not the foam.[7][4][16][1][8][12][10]
Puff or flat? A decision guide
This table pulls the limits above into one place. It is a summary of what the sources publish, not a test of any particular design.
| Question | 3D puff is a reasonable choice when | Flat embroidery (or partial puff) is the better choice when |
|---|---|---|
| How detailed is the artwork? | The elements are bold and can be built mostly from satin columns[2][9] | The detail you need to keep is fine enough to need a 65 needle, or the strokes are thin[7][8] |
| How wide are the key strokes at the finished size? | About 3 mm or wider (5 mm under Printful's spec), with room between them[2][7][13] | They cannot reach that width, or the gaps between them are tight[2][13] |
| What kind of lettering? | Bold letters with open space between them; Printful asks for at least 1.27 mm[13] | Script, calligraphy or a thin, complicated font[13] |
| What is the item? | Caps, and garments such as jackets and sweatshirts with a suitable foam grade[1][4] | Delicate, slippery or lofty fabric such as a towel (Levy), unless a strong backing makes it workable (Printwear)[10][16] |
| Does the design rely on large solid areas? | They can be rebuilt as satin, or as fill bordered with satin, an advanced construction[7][8] | Large fills that cannot be rebuilt or bordered[4][9][7] |
| Can production handle the extra steps? | The run can include a stop to lay foam, then tear-away and cleanup[2][5] | It cannot, for example where each piece must sew without an operator stop |
If the answers point both ways, the middle option is often the practical one: raise only the bold elements, such as a short word or the main shape, and sew the fine detail flat in the same design. Levy describes exactly this kind of design, with words or specific elements puffed up
.[10] For small text that is kept flat, see small embroidery lettering problems.
3D puff FAQs
Can foam be added under an existing flat file?
Our reading of the sources is no, not reliably. A flat file lacks the stop, the closed ends and the higher density described above, Melco notes that stock alphabets must be modified because of their open ends, and Printful re-digitizes from scratch when a design moves between flat and puff.[2][13]
How should 3D puff embroidery be washed?
Embroidery Library, a seller of home-embroidery designs, advises: Normal laundering is fine, but air dry. Avoid dry cleaning
.[18] Follow the garment's own care label as well.
Have a design you want raised in 3D puff?
Send the artwork with the finished size, placement and the foam thickness you plan to use, and we will review it for puff.
Sources
Technical statements in this article were checked against these sources on November 13, 2026. Recommendations from different makers vary; where they disagree, the article says so.
- Success with 3D Foam — Madeira UK, May 6, 2026
- General Digitizing Steps and Tips for Puff Embroidery (PDF) — Melco Applications Team
- How to Digitize for 3D Puffy Foam Machine Embroidery — Bernadett Csaszar, Hatch Blog
- PUFFY – Embroidery Foam for Three-Dimensional Effects (product sheet, PDF) — Gunold GmbH
- 3D Puff Embroidery on Caps (TAJIMAG tips) — Tajima Group, April 23, 2024
- Puffy Foam for Raised 3D Embroidery — ZSK parts shop
- Q&A from 3D Puff Embroidery Webinar — Wilcom; answers by Justin Armenta (JA Digitizing), July 17, 2024
- Taking on the Challenge of 3D Custom Foam Machine Embroidery — Erich Campbell, Impressions, September 10, 2026
- Creating 3D Embroidery with E-Zee 3D Foam — Madeira USA
- How to Increase Profits with 3-D Embroidery — Ed Levy, ASI, April 16, 2019
- How to use Bodybuilder 3D foam for embroidery — Madeira
- 3D Foam (Puff) Digitizing And Embroidering – Overview — Melco Help Center
- What is 3D puff embroidery, and how does it work? — Printful Help Center
- Why Is 3D Puffy Foam Profitable — Gunold Canada
- 3D Embroidery Foam – For Raised Embroidery — Madeira USA
- Reaching new heights with 3D foam — Printwear & Promotion (UK), May 27, 2014
- Tips For Cleaning Up Your Puffy Foam — Gunold Canada
- Puff Foam Embroidery — Embroidery Library, March 4, 2025